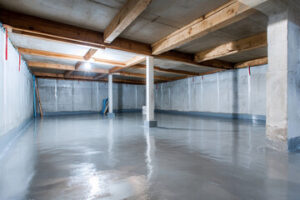
Moisture in your basement can cause costly water damage, rotting wood, and mold. Fortunately, basement waterproofing methods can protect your home from moisture infiltration, keeping your home dry and a safe environment for you and your family.
Exterior basement waterproofing involves excavating around foundation walls and applying a waterproof membrane or coating. This also includes installing a powerful drainage system to divert water away from the foundation. Contact Basement Waterproofing Bismarck for professional help.
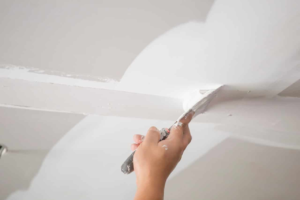
In order to prevent water from seeping into the basement, cracks in the foundation walls must be sealed. This process is one of the most time-consuming and labor-intensive parts of basement waterproofing, as it involves digging several feet into the dirt to expose the foundation. However, this step is necessary in order to protect the home from serious damage caused by a wet basement.
Basement wall cracks are often due to soil changes or construction defects, but they can also be a sign of underlying structural problems. When left untreated, these cracks allow water and air to enter the basement, leading to mold and mildew and increased energy costs. It is important to have these cracks repaired by a professional in order to keep them from spreading further.
To seal these cracks, professionals use a variety of techniques including epoxy and polyurethane injections. These products are specifically formulated to bond and adhere to concrete, making them perfect for sealing non-moving cracks. Polyurethane injections are especially effective in this application as they are more elastic than epoxy and can stretch to fill the crack.
These injections are also used in conjunction with a cavity drain system, as they can be used to direct water into the drainage channel. This is particularly useful in situations where the home’s existing foundation has been compromised by hydrostatic pressure, causing it to rise up against the basement walls.
The best way to prevent a wet basement is to ensure that the home is built on an appropriate slope for its location and that it has a good rainwater management system. This includes gutters and downspouts, drainage channels, sump pumps, and foundation cracks.
In addition to a basement waterproofing system, homeowners can take steps to prevent moisture in the house by regularly cleaning window wells, installing window well covers, and replacing old windows that have become clogged and leaky. They should also have their roofs inspected by a professional for missing or damaged shingles, as these can lead to costly roof leaks.
As more and more homeowners depend on their basements for office space, recreation space, and more, it is vital to invest in a waterproofing system that will protect this area of the home. With a little maintenance, this investment can prevent a basement flood that can cause serious damage to the structure of the home and personal belongings.
Drainage Systems
Drainage systems are an essential component of basement waterproofing because they prevent water damage, mold growth, and structural problems. They also improve indoor air quality by preventing moisture from condensing and lowering humidity levels. In addition, a dry basement contributes to a stable home and increases its value.
Effective drainage systems are designed to intercept water before it reaches the foundation walls. They can be installed inside the basement (interior drainage systems) or outside the foundation. Exterior drainage systems can include French drains, gutters, downspouts, grading, and other techniques for rerouting surface water away from the foundation. Interior drainage systems are comprised of pipes that collect water in areas prone to dampness, such as around the basement perimeter or below the floor. They typically connect to a sump pump, which pumps the collected water out of the basement and into the sewer system.
The type of basement drainage system that’s right for your home depends on the severity of your water issues and the structure of the foundation. A professional can assess your situation and recommend the most appropriate solution.
When water infiltrates a foundation, it often builds up against the wall, creating hydrostatic pressure. This pressure can crack and erode concrete, causing the foundation to sink and buckle. Basement drainage systems relieve this pressure by directing water to an exterior drainage area.
Ideally, the outlet point for your drain system should be located at the lowest elevation possible, so that it’s not affected by rainfall and floodwaters. The system should also be installed in a way that ensures that it won’t cause soil erosion or block the foundation from moving up and down with groundwater.
The most effective basement drainage systems combine an interior French drain with a sump pump and dehumidifier. The drain collects water that pools in the basement, while a dehumidifier removes excess moisture from the air. This combination allows the system to remove the most water possible in a timely manner, minimizes damage, and prevents mold from forming. The sump pump is then able to discharge the water quickly and easily, keeping your basement dry and reducing the risk of flooding.
Sump Pumps
A basement sump pump system is a critical component of any effective type C basement waterproofing design. It safeguards habitable spaces from ground water intrusion and prevents mold growth, ensuring a healthier living environment for you and your family. It is especially important for homes located in areas prone to flooding or heavy rainfall.
A sump pump system works by gathering groundwater channeled to it from a basement drain tile system. Once the water level in the pit reaches a preset height, a switch activates the pump to discharge the water into a pipe and away from your home.
The pump also eliminates the risk of mold and mildew, as moisture is removed before it can reach indoor spaces. Sump pumps are a cost-effective investment for homeowners, as they can save them the expense of cleaning up and repairing flood damage or the costs associated with mold and mildew.
To install a basement sump pump system, contractors dig a hole in the lowest part of the basement floor and place a sump liner/basin inside. The pit is then connected to the interior drainage system via pipes. The pump is then installed in the pit and connected to a discharge pipe that leads outside. A check valve is then installed to prevent backflow and a slope is created to direct the water away from the structure.
A battery backup can be added to ensure continued pumping in the event of a power outage. Specialist installers can also offer installation guarantees and professional indemnity insurance, adding peace of mind to the project and offering additional protection for your investment.
It’s crucial to test the system at least once a year to ensure it’s functioning properly. A simple test involves pouring water into the pit until it activates the pump and removing the water. The discharge line should also be regularly checked to make sure it’s clear of obstructions and directing water away from the structure. In colder regions, it may be necessary to take steps to prevent the discharge pipe from freezing and causing a clog.
Foundation Crack Injection
Foundation crack injection is the process of injecting epoxy resin into a basement foundation wall crack to fill it and seal it. It is a highly effective method for structural repair, reinforcing the concrete structure and enhancing its longevity. Unlike other methods, which only cover the surface with an ineffective sealant, this system injects the epoxy resin into the crack and into the capillaries of the concrete. As the epoxy hardens, it forms a rigid seal of high compressive and tensile strength which effectively keeps water out of the home.
Leaking basement walls are one of the main causes of water problems in homes. A damp environment is conducive to mold growth and deteriorates the structure of the home, which can compromise the safety and value of the property. Several factors can contribute to this including excessive moisture in soil, improper drainage systems and hydrostatic pressure.
Unlike exterior waterproofing which is done from the outside, basement crack injection is a reactive method that only takes place after the cause of the problem has been identified. It is most often used in situations where there are leaking basement walls caused by hydrostatic pressure. This type of pressure is created by the weight of the soil on and around the basement foundation and can be managed with the proper waterproofing techniques.
Injection of a basement foundation crack usually requires a few essential tools. This includes a high-pressure injection pump, injection ports and injection packers. It is important to properly plan the injection points, starting from the lowest point of the crack and working up the wall. It is also important to allow the surface paste epoxy to fully cure before commencing the injection. This will ensure that the ports and injected urethane foam do not rupture or blow-out when the injection is being conducted.
It is also recommended to inspect the block foundation for “cold joints” or areas where blocks are joined with mortar, which can provide an avenue for water penetration. It is important to have any of these areas sealed with a chemical grout in order to prevent water infiltration into the house. Injection of block walls is more challenging than with a poured concrete foundation and may require more extensive methods such as curtain or bladder injection to achieve an airtight and durable result.